Monday, September 29, 2008

Lunch

Tuna and chickpea salad with golden cherry tomatoes.

Preparation time: 10 minutes

Shopping: none

This salad was tossed together with a can of tuna from the pantry, an opened can of chickpeas in the fridge, a few slices of red onion and some Dr. Carolyn tomatoes from the garden. It was displayed on this week's green salad mix already bagged in the refrigerator and dressed with the simple mustard vinaigrette we had on hand.

I also like this salad with the giant marinated white beans usually available in the cheese section at the local Whole Foods. (They used to be displayed at the olive station, but then showed up prepacked with the fresh mozzarella cheeses. Last I checked, they were sold out--hopefully this is not another one of those outstanding items Whole Foods quietly removes from the shelves.)

What is most intriguing to me about this dish, however, is the canned tuna. I buy a water-packed white albacore tuna labeled as "U.S. wild-caught." Since the dolphin controversy and the warnings about mercury content, there hasn't been much news about canned tuna, so I turned to the Monterey Bay Aquarium's "Seafood Watch" site for an update.

Perhaps more than most fish, tuna is a quagmire for anyone trying to purchase sustainable seafood. Starting with albacore, for instance, "Seafood Watch" pronounces Tombo, canned white tuna, longfin Tunny and Albacora a "best choice" if it's caught off British Columbia or the U.S., and if it's caught by trolling or with a pole. Also, the same varieties are a "best choice" if caught in Hawaiian waters by trolling, with a poll or with a handline. However, those vary same varieties caught in Hawaii using the "longline" method are merely a "good alternative."

The trouble with albacore starts when you get into those same varieties using those same methods "worldwide" (except Hawaii). In the case of "worldwide," you should avoid that can of albacore.

As for Skipjack tuna, including Aku, "Canned Light Tuna," Arctic Bonito and Striped tuna, the "best" choice is either "worldwide" caught trolling or with a poll, or from Hawaii caught trolling, with a poll or with a handline. Again, a "good alternative" is from the same varieties caught near Hawaii using the "longline" method. To be avoided are the "imported" varieties using the longline method.

No misunderstanding there, right?

Unfortunately, I don't think much of this information is listed on the cans available for inspection at the local grocery store, including the Whole Foods, which has numerous varieties available in a wide range of prices. Once again, it's buyer beware.

Saturday, September 27, 2008

Kids Pickle Watermelon Rind

When I asked the kids in one of my "food appreciation" classes if they'd ever heard of pickled watermelon, one girl eagerly raised her hand.

"My grandmother always has some for Thanksgiving," she said. And gradually we learned that each year she travels with her family to grandma's house near Huntsville, Alabama, for a traditional family Thanksgiving, where grandma breaks out a few jars of pickled watermelon rind.

I was heartened to learn there's still a place where folks make pickled watermelon as a matter of tradition. Otherwise, you don't see it much anymore. Yet, far better to pickle the watermelon rind than just send it off to the landfill (or the compost pile--in fact, my worms love melon rind.)

This is one of those pickles that's more like a candy and entails quite a process--sitting in a salt brine, being drained, cooking in a spicy syrup, then sitting in the syrup overnight before being ladled into jars and processed.

It's really not all that much work. But what work there is takes place over a period of a couple of days, which meant that the kids in my classes would only get to see part of it. So what I had them do was separate the rind that I'd be pickling later from the sweet inside of the melon. Then we passed around the other ingredients for an olfactory exam--lemon, cinnamon, cloves, allspice, cardamon, ginger, vinegar.

We broke open some cardamom pods and tasted the tiny, black seeds inside. Just sucking on one for a few seconds is enough to fill your mouth with a sweet, almost licorice sensation. You knew that these pickles were going to be good. And of coarse the kids a bit later got to eat the insides of the watermelon.

This recipe comes from The Joy of Pickling, by Linda Ziedrich. To make four pints of pickled watermelon rind:

1 large watermelon
1/2 cup pickling salt (or sea salt without additives)
2 quarts water

Cut the watermelon into thick, round slices. Lay each slice flat and cut away the tough outer skin. (I use a serrated bread knife.) Cut the slice into quarters and carefully trim away the pink flesh (you can share that with friends). Cut the remaining rind into 1-inch pieces.

In a large bowl, dissolve the salt in the water and add the rind. Let the rind soak overnight. Drain and rinse the rind and least twice. Place the rind in a large, non-reactive pot and cover with cold water. Bring to a boil and simmer the rind for 5 minutes. Drain and return the rind to the bowl.

For the syrup:

1 large lemon, thinly sliced
2 3-inch cinnamon sticks, broken into pieces
1 teaspoon cardamom seeds
1 teaspoon whole cloves
1 teaspoon allspice berries
1 1 1/2-inch piece fresh ginger, thinly sliced
2 cups water
2 cups distilled white vinegar
4 cups sugar

Make a spice sachet by tying the lemon, cinnamon, cardamom, cloves, allspice and ginger in cheese cloth. Meanwhile, mix water, vinegar and sugar in a large, heavy, non-reactive pot. Add the spice sachet and bring to a boil, stirring occasionaly. Reduce heat and simmer for 5 minutes. Remove pot from heat, add melon rind and let the rind stand in the syrup for 12 to 24 hours.

After the rind has rested, bring it and the syrup to a boil. Reduce heat and simmer 5 to 10 minutes, or until the rind is translucent. Remove from heat. Remove the spice sachet and ladle the rind with syrup into hot pint canning jars, leaving 1/4-inch headspace. Cover with new lids and process in a hot water bath for 10 minutes.

Store jars in a cool, dark place several weeks at least before opening. Or wait until Thanksgiving.

Thursday, September 25, 2008

Oh, Deer

Having our friend Larry over for dinner is always an occasion to put on the Ritz. Lar's an accomplished cook himself, with tastes refined by years of travel. He's one friend we can count on to help us eat our venison stew with an understanding eye.

Lar also happens to be a fellow martini drinker and a man with an adventurous pallet. Cocktails, therefore, called for our best gin, stuffed olives and a big spread from our pickle collection. We put out pickled okra and spicy Cajun dills, bread and butter pickles and our famous sweet pickled green tomatoes. One of Lar's favorites was the fresh goat cheese from Boyds, Maryland, with our green apple and tomato chutney. As much as possible, we tried to use what we already had on hand. I turned an opened jar of marinated artichoke hearts into a quick-processed spread with Parmesan cheese.

Dinner began with a garden salad with freshly picked beets from the garden, a Spanish blue cheese and honey-mustard vinaigrette. We poured a fine Argentinian Viogner wine with that.

Our main course, the venison stew, was hardly the kind of hands-off meal I usually prefer. My favorite foods are those that cook themselves. This dish, by contrast, was quite a production.

In a previous post, I described marinating and browning the venison over coals on our deck. That went into the fridge. Meanwhile, I cooked and skinned a load of cipollini onions. I then browned them in a hot skilled. Then I dug up some carrots and roasted those in the oven. A composed dish was coming into focus, with the venison, onions and carrots sitting atop an underlayer of potato-turnip mash and sauteed greens from the beets that went into the salad. I already had creamed turnips in the freezer, so it was simply a matter of cooking some potatoes out of the garden and running them through the ricer. Some grated Parmesan cheese added another layer of flavor to the mash.

The finished dish, served in a large bistro-size bowl, is pictured above. The sauce consisted of nearly two bottles of red wine (used in the marinade) and four cups of beef stock (use veal stock if you have it) all reduced on the stove to less than two cups. With it we served a succession of French reds: a Verget du Sud and 2006 Cote du Rhone purchased by me for very little at Whole Foods, and a wonderful 2005 Corbieres, Chateau de Vaugelas, that Larry generously brought.

We hardly needed dessert, but we ate it anyway: our own homemade yogurt with fresh Mission figs and a drizzle of the local honey we bought at the pickle festival in New York.

We were all thoroughly stuffed. Oh, and the venison stew was well worth all the effort.

Wednesday, September 24, 2008

Pickled Okra

I recently heard from two friends who had very different reactions to the jars of pickled okra I had given them. One exclaimed how wonderfully spicy the pickles were. The other wondered why hers were so mild.

I puzzled over this for a while, then realized that one of these friends had received a jar that had been processed at least two months earlier, while the second friend had pickles that were practically brand new.

Moral of the story: to get the full benefit of those zesty spices, you really need to let the pickles rest for a few weeks--or months.

The recipe I use is from "The Art of Accompaniment" by Jeffree Sapp Brooks. It couldn't be much simpler: You just pack the okra, spices, garlic and chili peppers in a clean jar, pour it a hot brine of vinegar, water and salt, then cap the jars and process them in a pot of boiling water.

This recipe is enough to make four pints, but I don't always have two pounds of okra laying around. For me, it's easier to simply harvest what the garden offers as the okra grow to the right size, then make a quart of pickles when I've gathered enough. But here's the original recipe.

2 pounds fresh okra
2 2/3 cups cider vinegar
1 1/2 cups water
1 1/2 talespoons sal
4 garlic cloves, crushed and pealed
4 dried chili pods (I use ripe red jalapenos from the garden, seeded)
4 small bay leaves
2 tablespoon pickling spices

Divide the okra and other ingredients into 4 clean pint jars, or 2 quart jars. (It helps to pack some of the okra first stem-end-down, then continue packing stem-end up.) ring the vinegar, water and salt to a boil. Ladle brine into jars. Screw on caps and process in a boiling water bath-- 10 minutes for pint jars, 15 minutes for quart jars.

Store in a cool, dark place at least one month before opening.

Tuesday, September 23, 2008

Neighbors Sharing Venison


Having a front-yard kitchen garden brings us into contact with all kinds of admirers. People stop on the sidewalk to talk about the garden they remember from their grandmother. Or about their own garden. Drivers stopped at the traffic signal on the corner shout encouragement and questions out their car windows. "What you got growing there?"

One day an elderly gentleman from down the street stopped to chat about the Angus cattle he grows on a farm in Virginia and his troubles making any money from them. I suggested he might make a small fortune selling the meat in the local farmers markets. The man's nephew came around to collect some of our tomatoes. A few weeks later he brought a big venison roast as a gift.

This was some beautiful meat, about five pounds I'd guess. I cut it into big stewing pieces, trimmed away the silver skin and set to browning it. I've gotten so much grief from my wife about frying meat in the kitchen--(our pathetic Jenn-Air fan doesn't help much--the grease ends up all over the walls)--I decided to move my braising operation outside to the charcoal grill.


Here you see the meat browning in one of my favorite Le Creuset enameled pots directly over charcoal. Who knew?

The meat was marinated two days with lots of red onion, sliced carrots, celery, a head of garlic sliced in half, a big fistful of thyme sprigs, parsley, and nearly two bottles of red wine--all squished together in two freezer bags. After the long marinade, the meat was well-drained and even squeezed dry in paper towels. I used a lot of paper towels. Season the meat aggressively with coarse salt and freshly-ground black pepper. After browning, the meat is again drained on paper towels.


Perhaps I should not have been so surprised how well everything cooked in a pot set over hot coals. There was a generous layer of brown bits left at the bottom of the pot. After draining the marinade and picking out all the herbs, the remaining vegetables go into the pot to deglaze. Stir in about 1/4 cup flour and cook a few minutes more.


Finally, pour the reserved marinade liquid over the vegetables and press the meat into the liquid.


Cover the pot and simmer for two hours, or until the meat is perfectly tender. The dying coals make a cozy cooking environment for my enameled pot.


"See, look at all the grease spots," says my wife when I invite her onto the deck to see what I've been doing. Indeed, there are flecks of grease everywhere, just the thing she'd been complaining about in our kitchen. "Maybe what we need is a gas grill with a burner," she suggests. Maybe. But now I like making stew over hot coals.


I'm so pleased with myself, I have to sit down and enjoy a glass of wine and a little cheese. There's a nice breeze blowing on the decks. That's something you don't get in the kitchen either.

Monday, September 22, 2008

Penne with Leeks & Roasted Cauliflower

Don't look now, but I think I detect the flavors of fall creeping into the menu.

I like simple pasta dishes. The whole wheat varieties have arrived at a point where you no longer have to fear they'll have the flavor and texture of cardboard. They really are extremely good. I also like robust flavors and between the roasted cauliflower and the leeks, this dish has plenty.

While the pasta is cooking in a large pot of salted water, break a whole head of cauliflower into florets and toss them in a bowl with extra-virgin olive oil, salt, pepper and any of your other favorite seasonings--I use a shake of garlic salt and onion powder. Spread the cauliflower on a baking sheet and roast it in a 450-degree oven, turning once until the cauliflower has browned here and there and is just barely done.

Meanwhile, in a big iron skillet or saute pan, gently cook a medium-sized leek, cleaned and cut into bite-size pieces, in a tablespoon or two of extra-virgin olive oil. Season with salt to bring out the juices. I prefer to cook this covered just to speed things along.

When the leek is soft, add the cauliflower, a handful of cherry tomatoes sliced in half and a generous splash of white vermouth or white wine. Cover and cook a couple of minutes longer until the cauliflower is soft. Drain the cooked pasta and stir it into the skillet. Dress with some more olive oil, if desired, and adjust the seasoning.

I made this as a side dish, but I could easily see it served all on its own with a crisp glass of white wine to celebrate the changing of the seasons.

Saturday, September 20, 2008

We're In Martha Stewart Living

At the time of the Civil War, there were around 800 commercially viable varieties of apples in this country. Now there are perhaps 30, although you will find even fewer at the market at any given time. What a come-down for a noble fruit that arrived here with the colonists and once was considered essential food.

What we are left with are industrial apples that look good and travel well but in many cases are lacking the flavor and individuality of heritage apples. My assignment for the October installment of Martha Stewart Living was to profile one apple grower--Tree-Mendus Fruit Farm in Eau Claire, Michigan--that has managed to survive with a large collection of antique apples.

Like many family farms, this one had to adapt to a rapidly changing economic environment to stay in business. They still sell apples wholesale--mostly to Whole Foods in the Detroit and Chicago areas. But their main source of income now is attracting visitors from urban areas out to the farm to pick fruit (Tree-Mendus also raises peaches, cherries and other seasonal items) and just enjoy the wide-open spaces. Here's an income producer I hadn't heard of before: you can rent your own tree. Apparently, some families have been doing just that for years and years.

Tree-Mendus fruit farm now hosts more than 200 varieties of heirloom apples. Many are for sale in the farm store. If you really want to learn more about how apples have morphed in this country and around the world, read "Apples" by Frank Browning.

Oh, and they will ship many of their products, including frozen blueberries.

Thursday, September 18, 2008

Kids Put Up Simple Dills

High on my list of priorities is finding a simple, satisfying recipe for vinegar-brined dill pickles that will store in the pantry for a long time. For purposes of my "food appreciation" classes, it would also help if the whole process--from cucumber to finished pickle jar--could be accomplished in less than an hour.

Well, this might be it. I've adapted somewhat the formula right off the back of a container of Mrs. Wages Canning & Pickling Salt. For you teachers out there, this is a great exercise in standard measures (how many cups in a quart, tablespoons in a cup?) as well as addition, multiplication and division. In fact, there were a couple of conversions that even had this teacher stumped.

Brining with vinegar is a bit simpler that fermenting pickles in a salt brine. (The kids have been eating the pickles we fermented earlier in the month and loving them.) Both processes have the same aim of creating an acidic environment that prevents the growth of harmful bacteria. It's an age-old method of preserving food for the winter. And don't we all like a good pickle with our corned beef sandwich?

This method does go fast and the kids get a good introduction to canning tools and the canning process, as well as practice on their vegetable cutting skills. With kids, it's important to show them how to slice a whole cucumber lengthwise in half, then lay the halves flat on the cutting surface to slice them into quarters or spears. Chasing vegetables around a cutting board only invites accidents.

To make 4 pints:

4 clean, hot pint-sized canning jars with new lids
2 pounds small pickling cucumbers (such as Kirby)
several sprigs dill weed
4 cloves garlic, peeled and crushed
3 cups water
1 1/2 cups white vinegar
1/3 cup pickling salt (or additive-free sea salt)
3 Tablespoons granulated sugar

Cut the cucumbers lengthwise into quarters (spears). Place a small handful of dill leaves and a garlic clove at the bottom of each jar. Pack the jars (not too tightly) with cucumber spears.

Meanwhile, bring the water, vinegar, salt and sugar to a boil in a saucepan. Ladle the brine into the jars, leaving about 1/2 inch headroom. Screw on lids and process in a boiling water bath for 10 minutes. Remove jars. When cool, store in a cool, dark place at least three weeks before opening.

Note: It really helps to have some basic canning equipment, such as a jar lifter and wide canning funnel. Water kettles with a wire rack are standard equipment. I improvise, using my pasta pot with a drop-in strainer. That's to keep the bottom of the jars from making direct contact with the heat. The water should cover the jars to a depth of at least one inch.

Wednesday, September 17, 2008

Guilty Pleasure on the Jersey Shore

We couldn't very well make travel plans to the International Pickle Day festival in New York without visiting our friend Tom. Tom recently traded his condo digs in New York City for a house in Red Bank about an hour south on the Jersey Shore. In addition to having an incredibly well-preserved main street, with more ice cream parlors and places to buy "sliders" (mini hamburgers) than you can shake a pickle at, Red Bank is close to all the other traditional attractions, such as Asbury Park and here, the charter fishing fleet.

Red Bank is also close to Atlantic Highlands and the Mount Mitchell overlook. On a clear day, you can see the Manhattan skyline. And since you can also see the spot where the Twin Towers once stood, the site has been turned into a 9/11 memorial. Our original plan was to take a high-speed ferry across the bay into Manhattan on Sunday for the pickle festival. But not so many ferries run on Sunday afternoon, so we decided to drive. You'd be surprised how many cars are trying to get in and out of the Holland Tunnel on Sunday. That part was not so fun.

Also near Red Bank is the biggest Whole Foods I'd ever seen. I would happily trade ours just for the bulk aisle. Our friend Larry and I spent an exhausting part of the afternoon shopping for dinner: curried fish fillet with fresh tomato chutney, curry-roasted cauliflower and Indian-style zucchini fritters. Oddly enough, there was a Dairy Queen (DQ to those in the know) right next door. We were forced to make a detour for an afternoon snack that had "Jersey Shore" written all over it.

"Don't tell your wife," Larry whispered.

Don't worry, Lar. I won't.

Monday, September 15, 2008

Pickled in New York

I swear I am not making this up: There is an International Pickle Day festival and we were there this past weekend in New York City. This celebration of brine and fermentation is presented by the Lower East Side Business Improvement District and the New York Food Museum. An entire block of Orchard Street is given over to pickles, and we traveled there from the District of Columbia to take it all in. As you can see, we were not alone. In fact, more impressive than the pickles themselves were the crowds that jammed the vendor booths, vying for a taste.


This is a casual event, with lots of different pickles to sample and most for sale. In fact, Pickle Day seemed more like an advertisement for the numerous different pickle businesses located in and around New York, from big, established firms to home-based artisanal picklers such as you might see at the local farmers market.


We were astounded by how many otherwise normal looking individuals swarmed over the pickles. Would you be able to identify these people as pickle lovers if you had not caught them in the act?


There were even some two-fisted pickle eaters. No dainty nibbling here. We're talking about some aggressive pickle noshing.


At any given time, there were several dozen pickle aficionados in line waiting patiently for a free sample. Here, The Pickle Guys were giving out a choice of "new," "sour" and "hot" pickles from plastic barrels. The Pickle Guys normal work out of a store on Essex Street in New York, operating "under the rabbinical supervision of Rabbi Shmuel Fishelis." They sell a wide range of pickled vegetables, as well as numerous types of herring, white fish, lox, sauerkraut and olives. "We ship nationwide!" is their rallying cry.

The "hot" pickles were prepared very simply, with crushed red pepper.


Like this gentlemen, one of the McClure pickle clan, vendors at the Pickle Day festival take their pickling seriously. I could not help but notice the incredible whiteness the McClure pickles had maintained in the jar after brining. I was advised to try putting my cucumbers on ice for 24 hours before processing them. And for $10 a quart, you could take home the real deal.


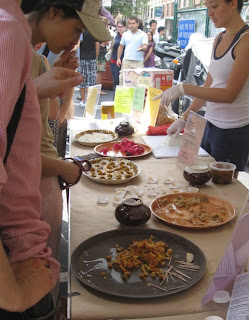
Tasting consisted of spreads such as this one, where the pickles were cut into small pieces and displayed with toothpicks. It was no easy feat squeezing through the crowds to get at the pickle platters, and the pieces were small enough that they were not always so easy to spear with a toothpick.


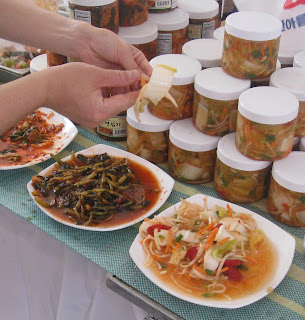
Here is some of the international flavor represented at Pickle Day: kimchi. I had been hoping for lots more pickles from different countries. Most of the vendors are occupied with American-style variations on the cucumber.


We sampled many different pickles and of the lot we were most impressed with this simple offering: pickled cantaloupe. Whoever thought of it was a genius, and we could not decide how you would get the melon to a pickled state without turning it to mush. Somehow, they did.


Over the crowd noise, if you listened closely, you could hear a bit of music. These guys were playing the theme from "Zorba the Greek." Not sure why. There wasn't anything Greek going on at the time.


If sampling pickles stimulates your appetite, there were also food vendors who took advantage of the situation to make some brisk sales. Here, sausages and--what else?--sauerkraut.


Like I said, you can find just about everything pickled at the Pickle Day festival. Among the more unusual items, we tasted pickled pears and pickled garlic scapes.

Maybe you are wondering how I came to be here? Turns out the organizers had been monitoring my many recent posts on pickle making and sent me an invitation. We turned it into a road trip. Who knew that New Yorkers were so crazy for pickles?

Thursday, September 11, 2008

KIds Can Tomatoes

We are overwhelmed with Roma tomatoes from our garden. Perhaps this is a good time to teach the kids in my "food appreciation" classes a thing or two about canning.

First job is to blanch the tomatoes in a big pot of boiling water for about 20 seconds (15 seconds is about the minimum). Chill them quickly in a bowl of cold water. As soon as they are cool enough to handle, you can start peeling away the skins.


Blanching loosens the skins. I teach the kids to make a small cut at the pointy end of the tomato, then pull the skin away in strips with the aid of their trusty plastic knives.


Once the skins are completely removed, we cut the tomatoes into quarters lengthwise, then cut the quarters into small small pieces or dice. The dice then go into a pot to be boiled for a few minutes. Ten or 12 will fill a one-pint jar. I show the kids how to ladle the tomatoes into a sterilized canning jar, add 1 tablespoon lemon juice and 1/2 teaspoon salt before screwing on the lid and processing the jar in a boiling water bath for 35 minutes.


But we also want something to snack on as a reward for all that tomato prep. So we peeled some more tomatoes and turned them into an easy pasta sauce with some sauteed onions and finely grated Parmesan cheese. A sauce of tomatoes fresh from the garden delivers uncommon flavor. The kids quickly wolfed it down.

Wednesday, September 10, 2008

Black Bean & Corn Salsa with Golden Cherry Tomatoes

We don't normally advocate food out of a can, especially at the peak of produce season. But beans are one thing that emerge from a tin perfectly edible, and I have no problem recommending canned black beans for this quick garden salsa. (Then again, if you want to cook your own black beans, by all means do so.)

This mix of black beans and fresh corn is familiar enough, especially with a Southwestern seasoning of cumin and cilantro. I've dressed it up a little with our own Dr. Carolyn golden cherry tomatoes. I can hardly think of a better place to show them off, in this case to go alongside some homemade crab cakes destined for a client. You could just as easily serve it next to flank steak, grilled fish or your favorite tacos.

This takes very little time, but do go to the trouble of using a freshly shucked ear of corn. Cook it in a pot of salted water, then remove the kernels from the cob. (My favorite method for this is to set a ceramic bowl, inverted, in the bottom of a large mixing bowl, then stand the corn cob on top of the bowl to cut away the kernels with a bread knife.) Mix the corn with a 14-ounce can of black beans, well rinsed, plus about 1/3 cup diced red onion. Mix in a tablespoon or two of extra-virgin olive oil, a generous splash of sherry vinegar (or lime juice), coarse salt and freshly ground black pepper to taste. Add about 1/2 teaspoon ground cumin and 1/4 teaspoon ground coriander, or to taste. At the end, toss in a dozen cherry tomatoes, halved, and a small handful of cilantro, chopped.

This will keep very well overnight in the fridge.

Monday, September 8, 2008

Black Radish Kimchi

Cleaning out a garden bed recently I discovered these four black radishes. It's hard to tell from the photo, but the three largest are all about the size of a fast-pitch softball. I have never seen radishes like this before (this is our first year for black radishes) and what is most amazing of all is they are still edible. For some reason, no matter how big they get, and at a point when most radishes are bursting out in flower and turning into wood, these black radishes are still soft and creamy.

Okay, so I'll find some way to eat them, I thought. And it just so happened I was already making cabbage kimchi and right next door to the recipe for cabbage kimchi was one for radish kimchi.

That would be on page 49 of Sandor Elix Katz's "Wild Fermentation." I improvised a little, using my black radishes instead of daikon radish, omitting the burdock and using some of my own turnips. This kimchi also includes horseradish to punch up the flavor.

Peel the radishes and cut them into wedges. Slice the wedges thinly. Do the same with two large turnips. Toss with two large carrots, also sliced thinly on an angle.

Place the vegetables in a large bowl or bucket, cover with water to a depth of about 1 inch, then remove the water, measure it and create a brine according to this formula: 3 tablespoons pickling or additive-free sea salt for each quart of water. Add the brine back to the vegetables, cover and allow to sit 24 hours.

After 24 hours, drain the vegetables, reserving the brine.

Meanwhile, make a past or slurry by finely chopping 6 peeled garlic cloves in a food processor. Add six red hot chilies (such a jalapeno)--seeded and deveined-- and chop fine. Add two large onions and process these until a slurry is achieved. Add about 1 cup freshly grated horseradish and 1/2 cup grated ginger.

Mix the slurry with the root vegetables and place in a crock or non-reactive bucket (I use a heavy-guage plastic bucket). Press the vegetables firmly with your balled-up fist until a brine rises to the top. If there isn't enough brine, add some of the reserved soaking brine. Cover with a ceramic plate, again pressing down firmly until the brine rises over the plated. The vegetables must be completely submerged to ferment and avoid spoilage. Weigh the plate down with a large plastic container filled with water.


Cover the crock or bucket with a tea towel to keep out dust and place in a cool, dark place to ferment. Taste the vegetables occasionally until they have fermented to your taste, then refrigerate, either packing the kimchi into jars or placing the whole crock or bucket in the refrigerator. The kimchi should keep for months.

I made this kimchi about a week ago and already it is starting to taste like the real deal.

Saturday, September 6, 2008

Green Beans with Sauteed Cherry Tomatoes

This is a great match: our meaty, full-flavored Romanette green beans with sweet Dr. Carolyn cherry tomatoes.

We think these golden cherry tomatoes are the best ever, with an assertive sweetness and round flavor. I was happy to see our opinion confirmed in the Southern Exposure Seed Exchange catalogue. "The most flavorful yellow cherry tomato we have grown," they write. "It has an excellent balance of sugar, tartness and depth of flavor."

In case you are wondering where "Dr. Carolyn" comes from, the tomato is named for Dr. Carolyn Male, one of the country's foremost tomato experts and the author of "100 Heirloom Tomatoes for the American Garden." In fact, it was from that book that I first thought to purchase some Dr. Carolyn seeds.

We have just one plant in our garden this year, but it is covered with golden tomatoes--more than enough for us. Plus, the plant seems utterly resistant to the fungal diseases that otherwise ravage less sturdy tomato varieties in our hot, humid District of Columbia climate.

We are also in love with these Romanette beans, an Italian variety of flat bean that grows profusely on compact bush plants. So easy to grow, and so productive. They make a perfect side dish simply cooked in salted water, then dressed with olive oil and grated Parmesan cheese. But combining them with the Dr. Carolyn tomatoes results in an ecstatic mingling of late-summer flavors.

Simply get a non-stick saute pan very hot on the stove, coat the bottom with extra-virgin olive oil and drop in a small bowl full of halved cherry tomatoes. While they sizzle, season with coarse salt. Toss one or two times until the tomatoes are showing the faintest hint of brown and are beginning to melt. Then toss in cooked green beans, season with a little more salt and freshly ground black pepper. Drop in a few basil leaves cut into a chiffonade and a splash of sherry vinegar. Toss a couple of times until the beans are heated through.

The final result isn't exactly pretty, but you'll be eating it right out of the pan.

Thursday, September 4, 2008

Sweet Potato Leaves

Every once in a while you learn something about the plant kingdom that makes you stop and think, I need to grow that.

So it was with sweet potato leaves, or when I learned that sweet potato leaves are edible. At the time, I did nothing about it. But on a recent visit to One Straw Farm in Baltimore County, owner Joan Norman mentioned that she had been selling sweet potato leaves in the farmers market. She said she had heard about them at an agriculture conference from a man from Africa.

Suddenly I was not only glad I had planted sweet potatoes, but made a priority of finding some way of working the leaves onto our dinner table. The occasion finally arrived last week when I struggled to find something green in the garden to put in our newest most favorite dish, curried okra. We're still harvesting okra on an almost daily basis and this stew with coconut milk, tomatoes and potatoes (basically, anything we can forage from the garden) proved to be a perfect place to use some of the Tuscan kale we were growing.

Well, the kale is gone, but it turns out sweet potato leaves work even better . They have a mild but dense flavor that reminds me a little of purslane. They stand up very well to cooking, maintaining their dark green color and a pleasantly easy texture. As a bonus, the leaves are a good source of vitamins A and C. And like purslane, they can be eaten raw.

Being a vine, the sweet potato plant produces a prodigious amount of leaves in addition to the tasty tuber we'll be harvesting later. At one time I was cursing our sweet potatoes for escaping their bed and traveling all over the yard where I needed to mow. They've climbed up, over and around the tomato cages. Now I'm cheering them on. I say, give us all the leaves you want.

If you are making the okra stew I posted about recently, just add a heaping cup (or two) or sweet potato leaves cut into a chiffonade instead of the kale originally called for. And if you planted sweet potatoes, be happy knowing that you have an almost endless supply of nutritious leaves.

Tuesday, September 2, 2008

Cabbage Kimchi

I am preparing a presentation on pickling for the local historical society and decided to extend my interest in sauerkraut into the realm of Koren Kimchi. Kimchi is to Koreans what tortillas are to Mexicans--something to be eaten at every meal. Kimchi is a little different, of course, in that it starts with fermented vegetables, usually with added heat from red peppers, garlic and ginger.

In the fall, kimchi becomes a national obsession in Korea with families focused on gathering vegetables to put up for the winter. Traditionally, big earthen pots were used to ferment and store batches of kimchi for the long term. Kimchi can be made out of almost anything--even fruit--but the usual suspects are hearty vegetables such as brassicas and roots. In this case, I'm using daikon radish and carrots to accompany the cabbage. I'm following a recipe in "Wild Fermentation" by Sandor Ellix Katz. It's a bit Americanized, in that it does not include some of the more exotic ingredients you might typically find in a Korean kimchi, such as dried shrimp or red pepper threads.

Like sauerkraut, kimchi involves a brine. To start the brining process, fresh vegetables are soaked in salted water 24 hours. Through osmosis, the salted water replaces the liquid in the vegetables, creating a friendly environment for beneficial microbes.

After the initial soak, the vegetables are bright and fresh looking and should have a lightly salted flavor.

The brine is drained off the vegetables, then the vegetables are tossed with a paste made of onion, garlic, ginger and red pepper. The mix then goes in a crock, canning jars, or, in my case, a heavy duty plastic bucket where I press everything firmly with my balled-up fist, then cover the vegetable mix with a ceramic plate and a plastic container full of water. The brine created by the vegetables should rise up over the plate. Here's the complete formula:

2 pounds roughly chopped Napa cabbage
1 large daikon radish, peeled and thinly sliced
2 large carrots, peeled and thinly sliced
2 quarts water
1/2 cup pickling or sea salt
6 cloves garlic
2 large onions, peeled and roughly chopped
6 red chili peppers (such as cherry peppers1 or red jalapenos)
1/3 cup grated ginger

In a large bowl or non-reactive bucket, soak vegetables overnight in brine made by dissolving salt in water. Drain vegetables, reserving brine, and set aside. Meanwhile, in a food processor, finely chop garlic. Add onions and process to a paste. Remove onion mix and process chili peppers until finely minced. Add ginger and process to a paste. Add onion mix back to process and combine.

Mix the onion paste thoroughly with the brined vegetables. Pack tightly into large jars, a crock or a bucket. Cover with a ceramic plate that just fits inside the container and weigh it down so that brine rises over the plate, completely submerging the vegetables. If needed, add some of the reserved brine to the container.

Cover the container with a tea towel and keep in a warm place. Taste daily until the kimchi has fermented to your taste. Refrigerated, it should keep for months.

Monday, September 1, 2008

Out With The Cukes

Today was time to say goodbye to our cucumber plants. They've been great producers, making hundreds of pickles. Pulling them out of the ground isn't easy after watching them daily since they were first planted on May 25. I gather one last bowl of cukes. You can see how the plants as they age begin making cucumbers of unusual shape and color.

This is what they looked like, on the right, only a couple of weeks ago. We planted two varieties of pickling cucumbers, Cross Country and Rhinish. They eagerly climbed a trellis made by hanging string from PVC pipe. Filling out the bed were several Italian zucchini plants and, at the far end, two Tuscan kales.

This is the same bed this morning, after the cucumbers were torn from the trellis and the squash plants pulled from the ground. It's time to get this area ready for a new crop. We want to try a second planting of potatoes. Potatoes are normally planted around St. Patrick's Day, but we have some seed potatoes from our farmer friend Mike, who thinks at a minimum we should be able to harvest a nice batch of "new" potatoes before the first hard frost.

The cucumber plants, meanwhile, were carried to the compost heap and chopped into smaller pieces. Their destiny now is to feed next year's crops. They have our thanks.